CIS-11 Home http://www.c-jump.com/CIS11/CIS11syllabus.htm

Color, Background, and Drawings


  1. Working with Color Schemes
  2. Choose a Color Scheme
  3. Edit or Delete a Color Scheme
  4. Apply the Color Scheme of One Slide to Another Slide
  5. Save a changed color scheme
  6. Applying Color and Effects to an Object
  7. Change an Object's Color
  8. Change an Object's Fill Effect
  9. Change the Slide Background
  10. View a Presentation in Black and White
  11. Working with Objects
  12. Group Objects Together
  13. Ungroup a Drawing
  14. Rotate or Flip an Object
  15. Orient text vertically
  16. Connect Shapes
  17. Aligning and Arranging Objects
  18. Display the Grid and Guides
  19. Align an Object to a Guide
  20. Align or Distribute Objects
  21. Arrange a Stack of Objects

1. Working with Color Schemes

  • Every presentation contains a set of colors called a color scheme.

  • A color scheme is a set of eight colors to be used as presentation colors.

  • The color scheme determines the colors for

    • background,

    • text,

    • lines,

    • shadows,

    • fills,

    • accents of slides.

  • Color scheme could apply to one slide,

    • or to all slides in a presentation.

  • Choose colors from standard color schemes in a template,

    • or create your own color scheme.

2. Choose a Color Scheme


Working with Color Schemes
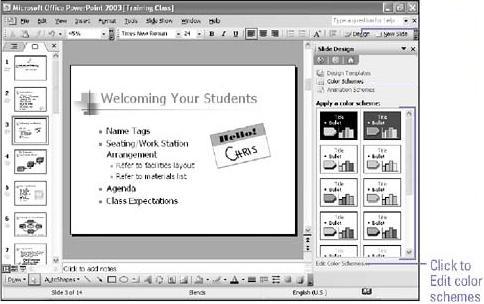
  • On the Formatting toolbar,

    • click the Slide Design button.

    • Click Color Schemes.

    • Click the color scheme you want.

3. Edit or Delete a Color Scheme


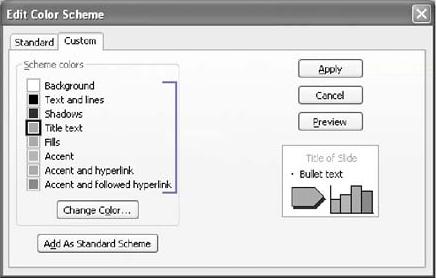
Edit or Delete a Color Scheme
  • On the Formatting toolbar,

    • Click the Slide Design button.

    • Click Edit Color Schemes.

    • To edit a color scheme,

      • click the Custom tab,

      • double-click a color,

      • click a new color,

      • click OK.

  • To delete a color scheme,

    • click the Standard tab,

    • click the scheme that you want to delete,

    • click Delete Scheme.

    • Click Apply.

4. Apply the Color Scheme of One Slide to Another Slide


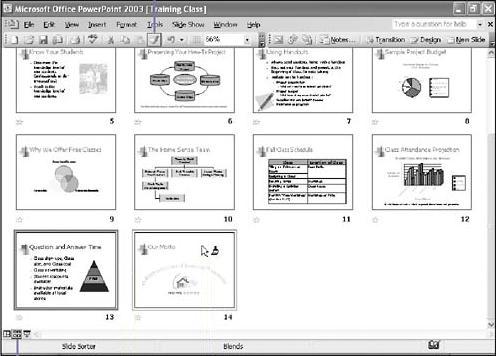
Apply the Color Scheme of One Slide to Another Slide
  • Click the Slide Sorter View button.

  • Click the slide with the color scheme you want to apply.

  • Click the Format Painter button on the Standard toolbar.

    • It applies the color scheme to one slide.

    • Double-click the button to apply the color scheme to multiple slides.

  • Click the slides to which you want to apply the color scheme.

    • The slides can be in the current presentation or in another open presentation.

    • If you are applying the scheme to more than one slide, press Esc to cancel Format Painter.

    • If you are applying the scheme to only one slide, Format Painter is canceled automatically.

5. Save a changed color scheme


6. Applying Color and Effects to an Object

  • To change the color of only one element in your presentation on only one slide:

    • Don't need to use the Color Scheme dialog box.

    • Instead, select the object,

    • open the Color dialog box for the color you want to change:

      • the fill - border - line - text, and so on.

    • The fill is the inside pattern or color of an object/background.

    • The fill is the color inside the border.

  • PowerPoint fill effects include

    • gradients, textures, patterns, and pictures.

  • The Color dialog box looks the same from one element to another.

  • When you work with color but printing handouts in black and white:

    • preview color presentations in grayscale and black and white.

7. Change an Object's Color


Applying Color and Effects to an Object
  • Click the object whose color you want to change.

  • On the Drawing toolbar,

  • click the Fill Color, Line Color, or Text Color button to change an object's color.

  • Click a color from the color scheme, or click More Fill Colors,

  • click select a color when done.

8. Change an Object's Fill Effect


Change an Object's Fill Effect
  • Click the object(s) whose color you want to change.

  • On the Drawing toolbar,

  • click the Fill Color button.

  • Click Fill Effects.

  • Click the tab,

    • Gradient, Texture, Pattern, or Picture

      to select the fill effect you want.

  • Select the options for the fill effect you want.

  • Click OK.

9. Change the Slide Background


Change the Slide Background
  • Display the slide whose background you want to change.

  • Click the Format menu,

  • click Background.

  • Click the Background Fill list arrow.

  • Select the color you want.

  • Click Apply,

  • or click Apply To All.

10. View a Presentation in Black and White


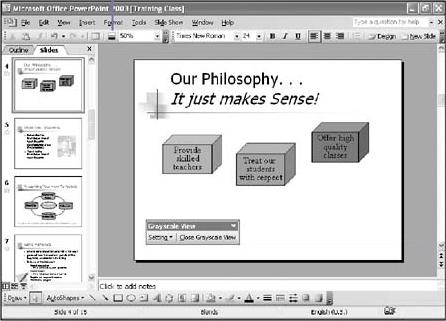
View a Presentation in Black and White
  • On the Standard toolbar,

  • click the Color/Grayscale button.

  • Click Grayscale or Pure Black And White.

  • Click the Close Grayscale View button on the Grayscale View toolbar.

11. Working with Objects

  • Create a collection of objects that work together

  • Group objects to create a new drawing object.

  • New object can move, resize, or being copied as a single unit.

  • To change the orientation of a drawing object,

    • rotate it

    • or flip it.

    • For example,

      • to create a mirror image of your object,

        • can flip it, or rotate it 90 degrees.

  • Rotating and flipping tools work with drawing and text objects.

  • Join shapes together with connecting line to create a flow chart or diagram.

  • Once shapes are joined, the connecting line moves along with shapes.

12. Group Objects Together


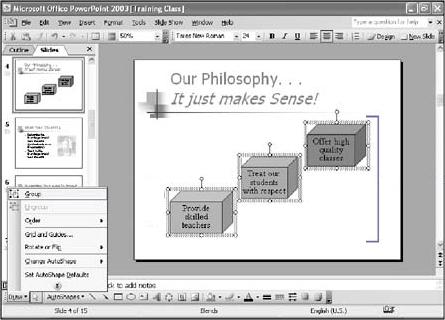
Group Objects Together
  • Select the objects you want to group together.

  • On the Drawing toolbar,

  • click the Draw button,

  • click Group.

  • To re-group an object quickly,

    • select one of the objects in the group you want to regroup,

    • on the Drawing toolbar,

    • click the Draw button,

    • click Regroup.

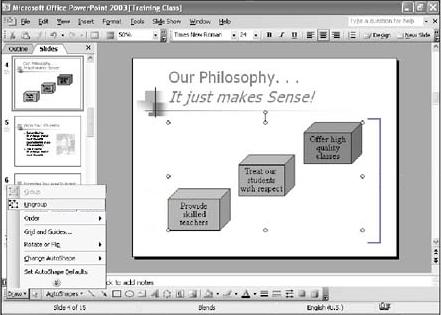
13. Ungroup a Drawing


Ungroup a Drawing
  • Select the grouped object you want to ungroup.

  • On the Drawing toolbar,

  • click the Draw button,

  • click Ungroup.

  • Use the Tab key to select objects in order:

    • Moves between the drawing objects on your slide,

    • including the shapes hidden behind other objects.

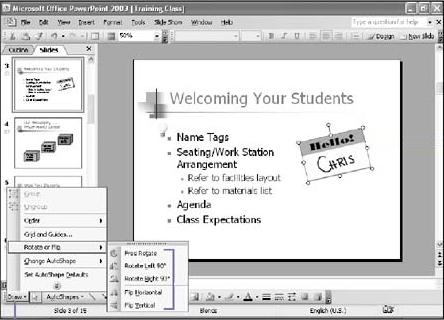
14. Rotate or Flip an Object


Rotate or Flip an Object
  • Click the object you want to rotate.

  • On the Drawing toolbar,

  • click the Draw button.

  • Point to Rotate Or Flip,

  • click the option you want.

  • If you click Free Rotate, drag the rotation handle to rotate the object.

15. Orient text vertically


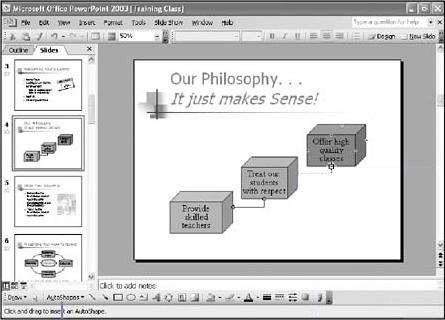
16. Connect Shapes


Connect Shapes
  • Red handles appear at each end of the line, indicating the objects are connected.

  • A yellow, diamond-shaped handle appears in the middle of the connector lines so that you can resize the curve of the line.

  • On the Drawing toolbar,

  • click AutoShapes,

  • point to Connectors,

  • click a connection option.

  • Position the pointer over a small blue handle on a shape,

  • click the object to select a connection.

  • Position the pointer over a small blue handle on another shape,

  • click the object.

17. Aligning and Arranging Objects


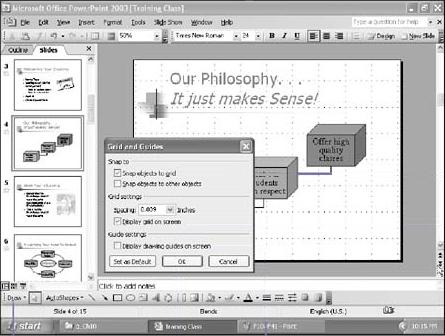
18. Display the Grid and Guides


Display the Grid and Guides
  • On the Drawing toolbar,

  • click the Draw button,

  • click Grids And Guides.

  • Select or clear the Snap Objects To Grid check box.

  • Select or clear the Display Grid On Screen check box.

  • Tip: click the Show/Hide Grid button on the Standard toolbar.

  • Select or clear the Display Drawing Guides On Screen check box.

  • Click OK.

19. Align an Object to a Guide


Align an Object to a Guide
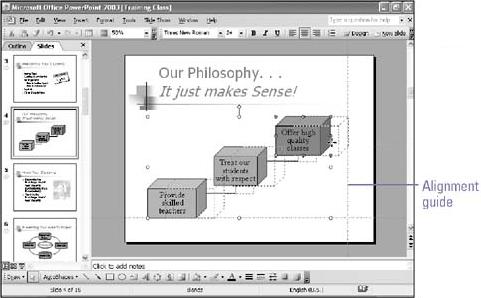
  • Display the Guides.

  • Position the pointer over a guide,

  • drag to change its position.

  • Drag the object's center or edge near the guide.

  • PowerPoint aligns the center or edge to the guide.

20. Align or Distribute Objects


Align or Distribute Objects
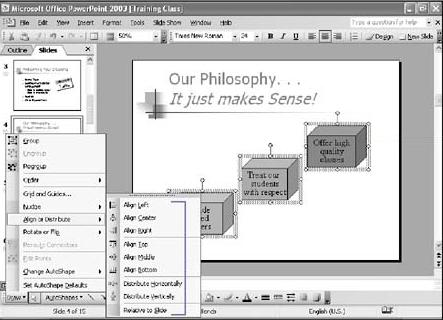
  • Select the objects you want to align or distribute.

  • On the Drawing toolbar,

  • click the Draw button,

  • point to Align Or Distribute,

  • click the command you want:

    • Align Left, Align Center, Align Right, Align Top, Align Middle, or Align Bottom.

  • Click Distribute Horizontally or Distribute Vertically.

  • Select Relative To Slide to align relative to the slide.

  • Deselect the Relative To Slide to align objects relative to each other.

21. Arrange a Stack of Objects


Arrange a Stack of Objects
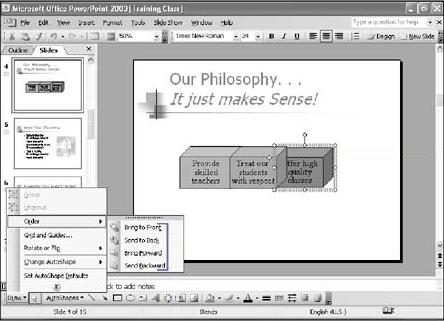
  • Select the objects you want to arrange.

  • On the Drawing toolbar,

  • click the Draw button,

  • point to Order,

  • click the command you want:

    • Click Bring To Front or Bring Forward to move a drawing to the top of the stack or up one location in the stack.

    • Click Send To Back or Send Backward to move a drawing to the bottom of the stack or back one location in the stack.