To use Microsoft Macro Assembler MASM and Visual Studio user-mode debugger, we can create and configure a Visual Studio C++ project:
-
Open Microsoft Visual Studio 2005
-
From the top menu, select File -> New -> Project...

CIS-77 Home http://www.c-jump.com/CIS77/CIS77syllabus.htm
To use Microsoft Macro Assembler MASM and Visual Studio user-mode debugger, we can create and configure a Visual Studio C++ project:
Open Microsoft Visual Studio 2005
From the top menu, select File -> New -> Project...

Click Project Type -> Visual C++
Click Templates -> Win32 Console Application
Type Name: M1
Type Location: C:\CIS77\Labs
Uncheck Create directory for solution check box - we don't need this!
Click OK.

Project Wizard Dialog Opens. Click Next.

Important! Make sure to do these steps in order:
Uncheck Precompiled header checkbox - we don't need this!
Check Empty project checkbox.
Click OK.

Empty project structure on the harddrive might look like this:

Download assembly program source file M1.ASM and save it into the project directory:
C:\CIS77\Labs\M1\M1.ASM
Go back to Visual Studio.
Click Solution Explorer icon on the standard toolbar, or click View menu -> Solution Explorer:

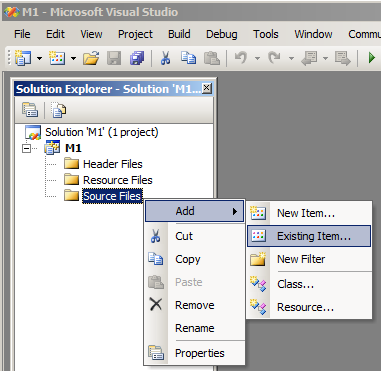
Inside Solution Explorer, right-click Source Files folder, Add... -> Existing Item.
Select M1.ASM file and click Add button:

|

|
Once you add an .ASM file to the project, the Custom Build Rules dialog opens.
Simply accept the default MASM rule by selecting it and clicking OK button.
Note: if you checked Do not show this again checkbox by accident, you can re-enable this dialog by Tools menu -> Options -> Projects and Solutions -> Show Build Rule Dialog.

In Solution Explorer, double-click the M1.ASM to open the M1.ASM source file.
This is a skeleton Assembly program:
 ; CIS-77
 ; your_program_name.asm
 ; Brief description of what the program does

 .386                ; Tells MASM to use Intel 80386 instruction set.
 .MODEL FLAT         ; Flat memory model
 option casemap:none ; Treat labels as case-sensitive

 .CONST          ; Constant data segment

 .STACK 100h     ; (default is 1-kilobyte stack)

 .DATA           ; Begin initialized data segment

 .CODE           ; Begin code segment
 _main PROC      ; Beginning of code

    ret

 _main ENDP
 END _main       ; Marks the end of the module and sets the program entry point label
You should now be able to build the program:
Click Build menu -> Build Solution.
Press F11 key to start the program in Debug mode. Console window will open, and debugging session will stop at the NOP instruction.
Right-click the nop instruction and select Go To Disassembly.
Press F10 key to step over to the next instruction, RET.
Press F5 key to continue. The program will finish and return back to the design mode.
Congratulations, you can now edit, assemble, link, and debug your assembly programs!
Once program is built, the directory structure looks like this:

By default, Microsoft IDE instructs the linker to generate and embed a .NET manifest into our program.
(Manifest is a text file containing metadata about .NET assemblies, which have nothing to do with MASM Assembler!
Manifest describes the relationship and dependencies between .NET application components, versioning information, scope information, and the security permissions.)
We don't need any manifests in our executable!
To remove the manifest, click
Project menu -> M1 Properties -> Configuration Properties, then
-> Linker -> Manifest File -> Generate Manifest -> No.
-> Manifest Tool -> Input and Output -> Embed Manifest -> No.
Click OK.

Note that there are also Microsoft Macro Assembler property pages at the bottom of the Configuration Properties. Those options we can change later as necessary.
Start command line window on your system: Start -> Run, type cmd, then hit the Enter key.
Command window will open.
To build the M1.EXE program from the command window, execute the following commands:
"C:\Program Files\Microsoft Visual Studio 8\Common7\Tools\vsvars32.bat"
cd C:\CIS77\Labs\M1\Debug
ML /coff /c /Fl ..\M1.ASM
LINK /debug /subsystem:console /entry:main /out:M1.exe M1.obj
Note: on 64-bit systems the location of Visual Studio may be different:
"C:\Program Files (x86)\Microsoft Visual Studio 8\Common7\Tools\vsvars32.bat"
To execute your program, type
m1.exe
at the command prompt.
is a debugger that emphasizes binary code analysis.
Version 1.10 is the final 1.x release; Version 2.0 is in development.
Download (final version).
OllyDbg does not require installation; unzip the files in any place on your harddrive and you are ready to go!
Start OLLYDBG.EXE.
Note: on Vista you should right-click and select Run as administrator, otherwise some debugging features may not work correctly.
Click File menu -> Open, and point to
C:\CIS77\Labs\M1\Debug\M1.exe
Debugging session begins immediately:

Click Debug menu -> Execute till user code (ALT+F9).
Debugging mode should stop at the NOP instruction.
Press F8 key to step over to the next instruction, RET.
To restart the program, press CTRL+F2 (or use Debug menu).
To stop and close M1.exe, press ALT+F2 (or use Debug menu).
Congratulations, you can now assemble and link on the command line, as well as debug with OllyDbg!