Course List: http://www.c-jump.com/bcc/
Our strategy is to keep each lab as a separate project under c155gui\labs.
Making a copy:
Open Windows Explorer and navigate to your Lab 2 subdirectory, c155gui\labs\c155_lab02_ch12.
Delete Debug, Release, and ipch folders.
Delete c155_lab02_ch12.sdf file.
Make a copy of Lab 2 folder.
Renaming the new project:
Rename new folder as c155gui\labs\c255_lab03_ch13.
Open c255labs\labs\c255_lab03_ch13\c155_lab02_ch12.sln in Visual Studio. (You can double-click the .SLN file name in Windows Explorer to open it automatically.)
Click menu
View -> Solution Explorer
In Solution Explorer, right-click the solution and rename it as c255_lab03_ch13.
Right-click the project name and rename it as c255_lab03_ch13.
Compiling and testing:
Save everything by CTRL+SHIFT+S.
Build and run the program. Everything should compile and run without a problem.
Saving your work:
Click menu
Buiid -> Clean Solution
Exit Visual Studio.
Save your work at c255labs top-directory level. Before saving, remeber to delete Debug, Release, and ipch folders from every project you worked on, as well as the .SDF files. This will save you time and megabytes of space on your hard drive.
All shapes are attached to the window. The shapes are made from smaller primitives. For example, a Polygon is made of Line primitives. The window remembers attached drawable primitives:
When GUI Display engine decides it's time for the window to be rendered, it invokes Window::draw() function. In turn, the window iterates through the collection of drawable primitives and invokes draw() for each one:
Notice that when you click Visual Studio menu
View -> Solution Explorer
project's source files (.cpp) list contains multiple files:
Graph.cpp // Shape classes: Line, Rectangle, Open_polyline, // Closed_polyline, Polygon, Text, Axis, Circle, // Ellipse, Image. // Helper classes: Color, Line_style, Font GUI.cpp // Buttons, text boxes, and other gadgets main_gui.cpp // Our main() function Window.cpp // Application window
Double-click the Graph.cpp, then right-click the first line
#include "Graph.h"
and select Open Document "Graph.h". Examine the code.
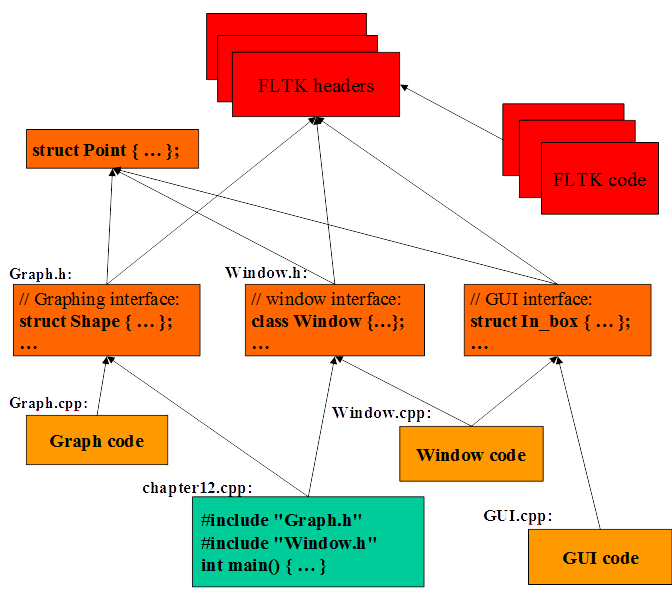
There's more source code as well as pre-compiled binary libraries included in our C++ project:
In editor view of Graph.h, right-click the line
#include "Point.h"
and select Open Document "Point.h". Examine the code.
Notice that
A Point is simply a pair of ints (the x and y coordinates.)
The entire graphics interface is placed inside namespace Graph_lib:
namespace Graph_lib { //... }
Switch back to Graph.h in the source editor. Find struct Shape. The Shape holds lines which are represented as pairs of points.
A Line is a Shape defined by two Points. Modify main() to try this example: chapter_13_2.cpp (download). Remember that in our project textbook source code is located under the book subdirectory, so if you copy and paste the entire program, you need to adjust the #include directives accordingly:
#include "book/Simple_window.h" // get access to our window library #include "book/Graph.h" // get access to our graphics library facilities
Individual lines are independent: we can adjust the color and style of each:
horizontal.set_color( Color::red ); vertical.set_color( Color::green );
The Lines object holds a set of lines. Modify main() to try this example: chapter_13_3_1.cpp (download)
We want to use Lines when we want to manipulate a set of lines as one shape, e.g. move them all together with one move statement.
Find struct Lines in Graph.h header file. Observe that the Lines is derived from the Shape:
struct Lines : Shape { // independent lines //... };
We can say that in our design
Lines is derived from the Shape
Lines inherits from Shape
Lines is a kind of Shape
Shape is the base of Lines
This is the key to what is called object-oriented programming. Much more about that in Chapter 14.
Open Graph.h in the source editor. Find struct Lines and examine the member functions. Open Graph.cpp in the source editor and find Lines::draw_lines() member function definition. It has a loop that renders individual lines by calling fl_line(), which is FLTK drawing function:
for ( int i = 1; i < number_of_points(); i += 2 ) { fl_line( point( i - 1 ).x, point( i - 1 ).y, point( i ).x, point( i ).y ); }
Since FLTK is used in the implementation of struct Lines and not in the interface, we could replace FLTK with another graphics library.
The next sample demonstrates drawing a grid: chapter_13_3_2.cpp (download). A Lines object may hold many related lines and manage them a single object.
Compile and run this sample.
Oops! Notice that the last column is narrow, and there's a grid line on top of the Next button, etc. Tweaking required - as usual!..
Open Graph.h in the source editor, find struct Color and examine its declaration. This is a helper structure that maps FLTK colors and organizes the scope for them. The Color also deals with visibility/transparency of the pixel. The transparency is also known as the alpha component (as in RGBA.)
Color example: we can modify the grid program by adding
grid.set_color( Color::red );
See chapter_13_4.cpp (download) sample.
Open Graph.h in the source editor, find struct Line_style and examine its declaration. This is another helper structure to control the line styles as necessary. For example, try
grid.set_color( Color::red ); grid.set_style( Line_style::dot ); //-or- grid.set_style( Line_style( Line_style::dash, 2 ) );
The Color and Line_style may be specified for the individual lines and other drawing primitives that have line borders. For example, see chapter_13_5_3.cpp (download).
Open Graph.h in the source editor, find struct Open_polyline and examine its declaration. It is similar to the Lines struct, except that you add one point at a time, so the final drawing primitive is made of connected lines. See chapter_13_6.cpp (download) for illustration.
The struct Closed_polyline is derived from the Open_polyline. The user interface to both of these shapes is exactly the same. You get an instant result simply by replacing Open_polyline with Closed_polyline in your source code, as demonstrated in chapter_13_7.cpp (download).
If we add one more point
cpl.add(Point(100,250));
to the closed polyline as illustrated in chapter_13_8_1.cpp (download), then the shape becomes
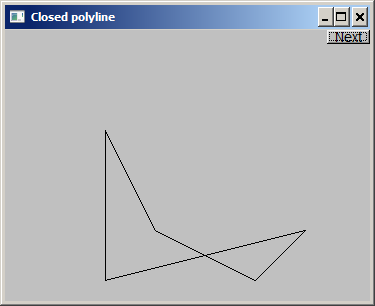
Thus, a Closed_polyline is not a polygon. Some closed polylines look like polygons. A Polygon is a Closed_polyline where no lines cross.
A Polygon has a stronger invariant state than a Closed_polyline.
Program chapter_13_8_2.cpp (download) illustrates the Polygon. Please note that to avoid name collision with a Polygon from Windows GDI (graphics device interface), we must declare our own polygon prefixed by the namespace name followed by the scope resolution operator :: like this:
Graph_lib::Polygon poly; | | | | | | | `-- variable name | | | | | `-- class or struct name | | | `-- scope resolution operator | `-- namespace name
The fill color, line color, and line style are supported by the Polygon shape. For example,
poly.set_fill_color( Color::yellow ); poly.set_style( Line_style( Line_style::dash, 4 ) );
A Rectangle is also a polygon. See chapter_13_9_1.cpp (download) example program. Be sure to use namespace name to avoid name collision with Windows GDI:
Graph_lib::Rectangle rect00( Point( 150, 100 ), 200, 100 ); Graph_lib::Rectangle rect11( Point( 50, 50 ), Point( 250, 150 ) ); Graph_lib::Rectangle rect12( Point( 50, 150 ), Point( 250, 250 ) ); // just below rect11 Graph_lib::Rectangle rect21( Point( 250, 50) , 200, 100); // just to the right of rect11 Graph_lib::Rectangle rect22( Point( 250, 150 ), 200, 100); // just below rect21
Sample chapter_13_9_4.cpp (download) illustrates a few additional Rectangle and Window functions:
Rectangle::move(); Rectangle::set_fill_color(); Rectangle::set_color(); Window::put_on_top();
Circle chapter_13_12.cpp (download)
Ellipse chapter_13_13.cpp (download)
Marked_polyline chapter_13_14.cpp (download)
Marks chapter_13_15.cpp (download)
Circles and Marks combined chapter_13_16.cpp (download)
Image chapter_13_17.cpp (download) - explained next.
Since we need to specify a relative path to the image files on disk, here's modified version of the chapter_13_17.cpp (download) example:
#include "book/Simple_window.h" // get access to our window library #include "book/Graph.h" // get access to our graphics library facilities //------------------------------------------------------------------------------ int main() try { using namespace Graph_lib; // our graphics facilities are in Graph_lib Simple_window win(Point(100,100),600,400,"Images"); Image rita( Point( 0, 0 ), "../../example/images/rita.jpg" ); Image path( Point( 0, 0 ), "../../example/images/rita_path.gif" ); path.set_mask( Point( 50, 250 ), 600, 400 ); // select likely landfall win.attach( path ); win.attach( rita ); win.wait_for_button(); // Display! } catch(exception& e) { // some error reporting return 1; } catch(...) { // some more error reporting return 2; }
Open Graph.h in the source editor, find struct Text and examine its declaration. Text usage is illustrated by chapter_13_11.cpp (download).
Find implementation of Text::draw_lines() in Graph.cpp. The function calls fl_draw()
fl_draw( lab.c_str(), point( 0 ).x, point( 0 ).y );
Here, fl_draw() is another basic text drawing function from FLTK library.
In this sample,
new makes an object that you can give to a Vector_ref to hold
Vector_ref is built using std::vector, but it is not in the standard library
#include "book/Simple_window.h" // get access to our window library #include "book/Graph.h" // get access to our graphics library facilities //------------------------------------------------------------------------------ int main() try { using namespace Graph_lib; // our graphics facilities are in Graph_lib Simple_window win( Point( 100, 100 ), 600, 400, "16*16 color matrix" ); // Vector_ref: used like vector // but imagine that it holds references to objects Vector_ref< Graph_lib::Rectangle > vr; for ( int i = 0; i < 16; ++i ) { // i is the horizontal coordinate for ( int j = 0; j < 16; ++j ) { // j is the vertical coordinate vr.push_back( new Graph_lib::Rectangle( Point( i * 20, j * 20 ), 20, 20 ) ); vr[ vr.size() - 1 ].set_fill_color( i * 16 + j ); win.attach( vr[ vr.size() - 1 ] ); } } win.wait_for_button(); // Display! } catch( exception& ex ) { // some error reporting return 1; } catch( ... ) { // some more error reporting return 2; }
What is class Shape?
Introduction to object-oriented programming
There are no files to submit. Contact your instructor if you have questions or experience problems compiling and running the code.